The Digital Diagnostic display
Using the Digital Diagnostic display to determine what is happening to your Brooks Stairlift
Please select the stairlift diagnostic code below.
Is Your Stair Lift Bleeping? Click Here |
Code: BLANK
Status
Stairlift Powered Down
Description
Battery is disconnected or completely drained.
Solution
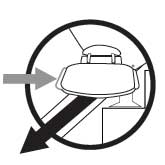
Check that the red isolator plug on the carriage is in.
[ Instructions for fitting new batteries ]
Code: 0
Status
Batteries Low
Description
Stair Lift batteries are low
Solution
Batteries require charging. Move the Stair Lift to either the top or bottom of the rail to begin charging. Click Here if your batteries are not charging.
Code: 1
Status
Normal operation
Description
Stair lift is fully operational condition and ready for use.
Please Note: A continuous beeping indicates that the batteries are not being charged and must be investigated.
Solution
Your ACORN Stair lift is in full working order. Click Here if your batteries are not charging.
Code: 2
Status
Stair lift is not charging
Description
The stair lift is not recieving any power to charge the batteries.
Solution
If the lift is mid-track, send the lift to either end of the track and park it over one of the charge points.
If lift continues with this code: Check the transformer is plugged in and switched on. Check the charge point at the other end of the track; Check the charge point plungers on the carriage are not stuck in.
Code: 3
Status
Over Speed Governor
Description
Over Speed Governor is a mechanical braking device to stop the lift from an uncontrolled descent. This code signifies that it has been activated.
Solution
Find the hand-winding wheel (gray mushroom shaped object approx. 5" in diameter, generally left under the rail on one of the stair treads).
Check that no objects are caught or jammed on the underside of the carriage unit.
Pull out the red battery isolation plug to prevent the carriage from being operated.
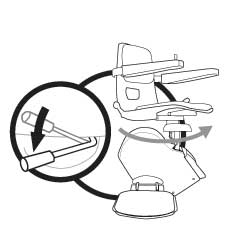
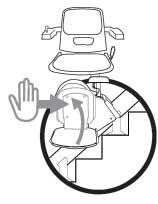
Prise out the white disk on top of the carriage (a blunt knife or screwdriver may be required).
Place the hand-winding wheel into the hole and wind the carriage up the stairs (turn the wheel clockwise - do NOT turn anti-clockwise) maximum of ten turns until the digital display stops showing '3' and displays '1'.
Take the hand-winding wheel out of the hole and send the lift to the top of the rail and run it back down again just to check everything is ok.
Code: 4
Status
Seat swivel switch
Description
The stair lift has a safety feature so that when the seat is not in the correct position for travelling it will not move. This code indicates that the seat is not in the corrct postion to operate.
Solution
Check the seat is locked in the ride position (the back of the seat should be against the wall the lift runs up).
Note: Models with perch or standon option require the arm to be in the fully down position before operating.
Seat in ride position
Sit on the lift, press the swivel lever and turn the seat a few degrees then twist the seat back into the correct position.
Seat not in ride position
Press the seat swivel lever and turn seat so it is in the ride position (as stated above).
If you have attempted the above and the code is still showing the micro switch which senses the position of the seat may be jammed or needing adjustment - [Click here for adjustment instructions].
Code: 5
Status
Key switch
Description
In order to stop unauthorized use of your Stair Lift it is fitted with a key switch. When this code shows the lift has been switched off using the key.
Solution
The key may be switched to the off position.
Check the lift is switched on at key switch, located by the digital display on the carriage. Try and pull the key out of lock. If it does not pull out the lift is switched on. If it pulls out, place the key back in the lock and turn it clockwise.
Code: 6
Status
Final Limit switch
Description
The stair lift has activated the final limit switch, there are two points on the rail where this is more likely to occur, at the top and the bottom of the rail, where the limit stop ramps are. These ramps are designed for the soft stop of the stair lift, and to ensure it comes to a halt in the correct position. When this code shows the stair lift may have overrun the final limit.
Solution
Lift at top
Locate the hand-winding wheel (gray mushroom shaped object approx. 5" in diameter, generally left under the rail on one of the stair treads). Prise out white disk on the carriage (a blunt knife or screwdriver may be required). Place hand-winding wheel into the hole and wind the lift down the track (turn anti-clockwise). Take the hand-winding wheel out and run the lift down the track and back up to check the lift is ok.
Lift at bottom
Locate the hand-winding wheel (gray mushroom shaped object approx. 5" in diameter, generally left under the rail on one of the stair treads). Prise out white disk on the carriage (a blunt knife or screwdriver may be required). Place hand-winding wheel into the hole and wind the lift up the track (turn clockwise). Take the hand-winding wheel out and run the lift down the track and back up to check the lift is ok.
Lift mid track
Check the limit switches. The switches are located under the carriage just above the rail and are made of brass with a small wheel on each of them. All limit switches should be level (fully extended) when off the limit ramps on the track. If any of the switches are raised, push the switch roller/plunger down with a screwdriver, so it is level with the others.
Code: 7
Status
Footrest Safety edge and / or Footrest Safety Pad (Underside of footrest) - Switch - down side
Description
The Stair Lift is fitted with five different safety surfaces to stop the lift if it hits any object. There are three on the footrest and two on the carriage itself. The code will tell you which one has been activated.
Solution
The lifts location determines which edges have been activated. Check for obstructions and if none, check the safety edges are moving freely.
Lift at top
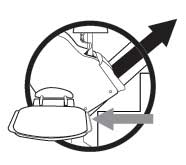
To check down safety edges, depress footrest safety edge furthest from stair nose with the heel of the hand then fold the footrest up and depress the center of the underside. Next, run hand up the track until it touches the carriage and depress safety edge found at this point. All safety edges are spring loaded and should move freely.
Lift at bottom
To check up safety edges, depress footrest safety edge closest to stair with the heel of the hand, then run hand down the track until it touches the carriage and depress the safety edge found at this point. All safety edges are spring loaded and should move freely.
Lift mid track
Check all safety edges.
Code: 8
Status
Foot-Switch - up side
Description
The Stair Lift is fitted with five different safety surfaces to stop the lift if it hits any object. There are three on the footrest and two on the carriage itself. The code will tell you which one has been activated.
Solution
The lifts location determines which edges have been activated. Check for obstructions and if none, check the safety edges are moving freely.
Lift at top
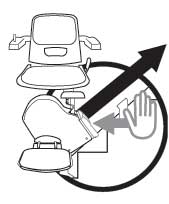
To check down safety edges, depress footrest safety edge furthest from stair nose with the heel of the hand then fold the footrest up and depress the center of the underside. Next, run hand up the rail until it touches the carriage and depress safety edge found at this point. All safety edges are spring loaded and should move freely.
Lift at bottom
To check up safety edges, depress footrest safety edge closest to stair with the heel of the hand, then run hand down the rail until it touches the carriage and depress the safety edge found at this point. All safety edges are spring loaded and should move freely.
Lift mid track
Check all safety edges.
Code: 9
Status
Carriage Safety Pad Switch - up side
Description
The Stair Lift is fitted with five different safety surfaces to stop the lift if it hits any object. There are three on the footrest and two on the carriage itself. THe code will tell you which one has been activated.
Solution
The lifts location determines which edges have been activated. Check for obstructions and if none, check the safety edges are moving freely.
Lift at top
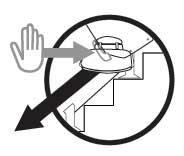
To check down direction safety edges, depress footrest safety edge furthest from stair nose with the heel of the hand then fold the footrest up and depress the center of the underside of the footrest safety pad. Next, run your hand up the track rail until it touches the carriage and depress the safety edge found at this point. All safety edges are spring loaded and should move freely.
Lift at bottom
To check the up direction safety edges, depress the footrest safety edge closest to stair with the heel of the hand, then run your hand down the track rail until it touches the carriage and depress the safety edge found at this point. All safety edges are spring loaded and should move freely.
Lift mid track
Check all safety edges.
Code: A
Status
Carriage Safety Pad Switch - down side
Description
The Stair Lift is fitted with five different safety surfaces to stop the lift if it hits any object. There are three on the footrest and two on the carriage itself. The code will tell you which one has been activated.
Solution
The lifts location determines which edges have been activated. Check for obstructions and if none, check the safety edges are moving freely.
Lift at top
To check down direction safety edges, depress footrest safety edge furthest from stair nose with the heel of the hand then fold the footrest up and depress the center of the underside of the footrest safety pad. Next, run your hand up the rail until it touches the carriage and depress the safety edge found at this point. All safety edges are spring loaded and should move freely.
Lift at bottom
To check up safety edges, depress footrest safety edge closest to stair with the heel of the hand, then run hand down the rail until it touches the carriage and depress the safety edge found at this point. All safety edges are spring loaded and should move freely.
Lift mid track
Check all safety edges.
Code: C
Status
Battery Fault
Description
The Stair Lift battery has either been over charged or may have run flat.
Solution
Batteries flat
Lift has been run until battery is flat. Lift will attempt to reach charge point at half speed and then charge for 40 minutes before moving again.
Over charged
The battery volts are above 28 volts so the transformer is damaged. Attempt to move the lift by moving the arm control. If the lift will not move remove the red isolation lead for 15 seconds, replace and try to move lift again.
If the lift will still not move call for service information
In order to check the battery or replace it please click the following link
[ Instructions for fitting new batteries ]
Code: E
Status
Brake Fault
Description
The brake is not working properly.
Solution
Brake is not energizing (releasing) Check stationary, battery voltage is at least 22 volts.
If it is less then replace or recharge batteries.
Code: F
Status
Motor Fault
Description
The motor will not run. A connector or fuse may be damaged or is disconnected.
Solution
Most likely cause of fault is the motor brushes are stuck or clogged with carbon dust.
Requires visit by an engineer.
Code: U
Status
Relay Fault
Description
Stair Lift requires to be reset.
Solution
If Stair Lift fails to operate after a reset a visit by an engineer is required.
Installation Guide
Click below to view the various stages involved in the installation of a Brooks Straight Stairlift.
- Step 1 - Your Stairlift Delivery
- Step 2 - Site Preparation
- Step 3 - Joining the Rail
- Step 4 - Installing the Rail
- Step 5 - Installing the Carriage
- Step 6 - Setting the Seat Angle
- Step 7 - Setting the Footrest Angle
- Step 8 - Installing the Seat
- Step 9 - Setting the Top Stopping Point
- Step 10 - Fixing down the Rail
- Step 11 - Connecting the Transfomer
- Step 12 - Stairlift Checks
Click below to dowload a PDF detailing the Installation of Brooks Straight Stairlift.
The Digital Display
View all the digital codes shown on the Brooks Stairlift here.